FizzGate管理后台自2.7.0版本后支持对接自定义第三方平台的OAuth,本文档介绍如何对接。
前提:仅商业授权版本支持对接OAuth
# 对接OAuth说明
FizzGate基于JustAuth(开源地址:https://github.com/justauth/JustAuth)实现的第三方登录,自定义第三方平台的OAuth文档:https://justauth.wiki/features/customize-the-oauth/
本文采用Gitlab的第三方登录为例。其他第三方请参考JustAuth的文档和相关平台文档
# 对接准备
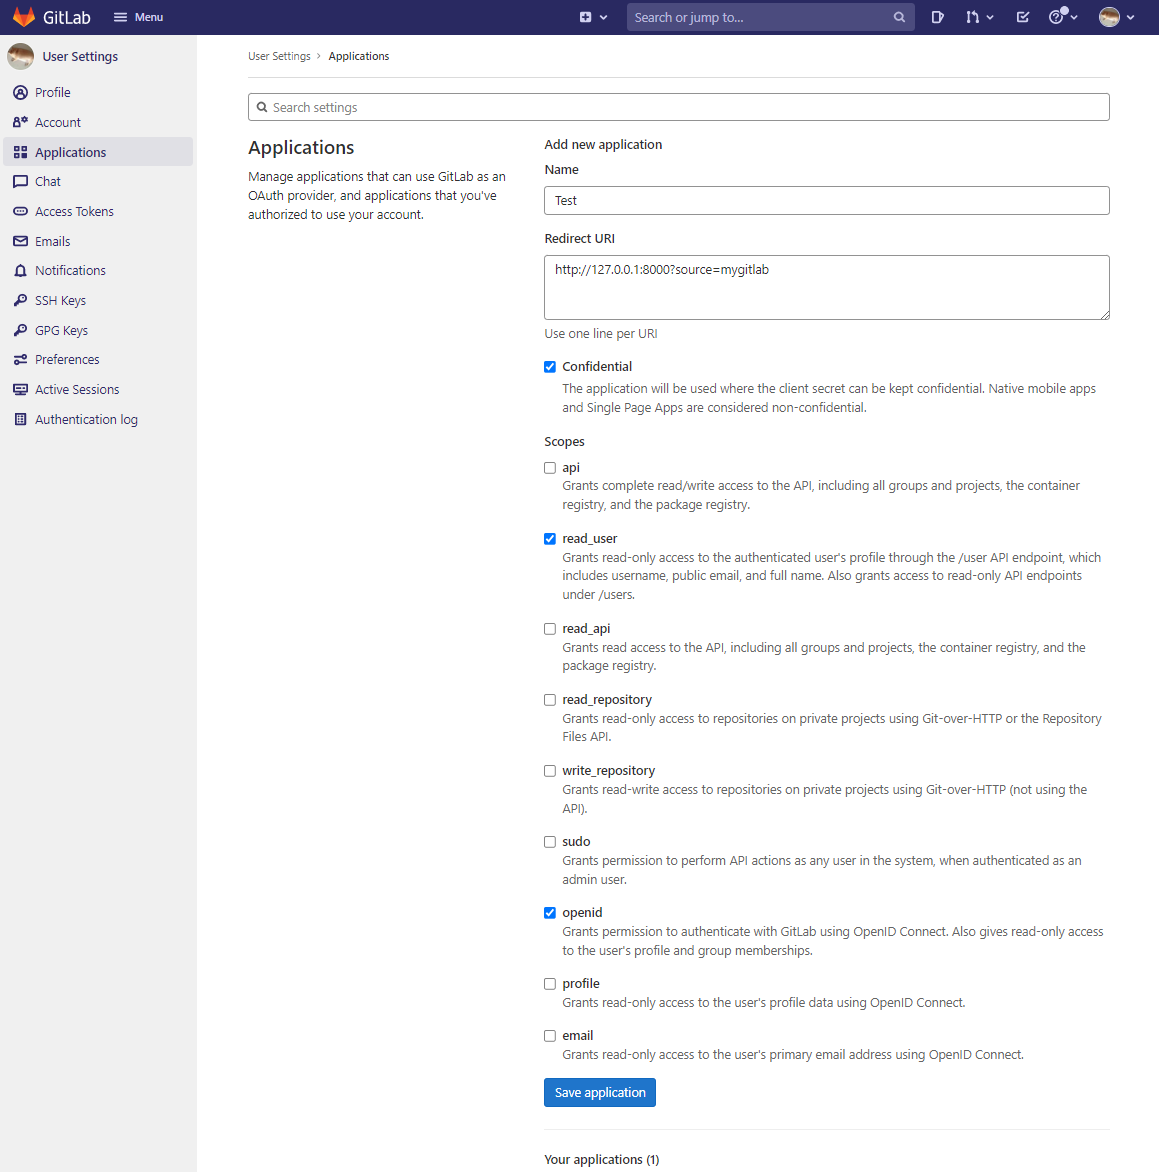
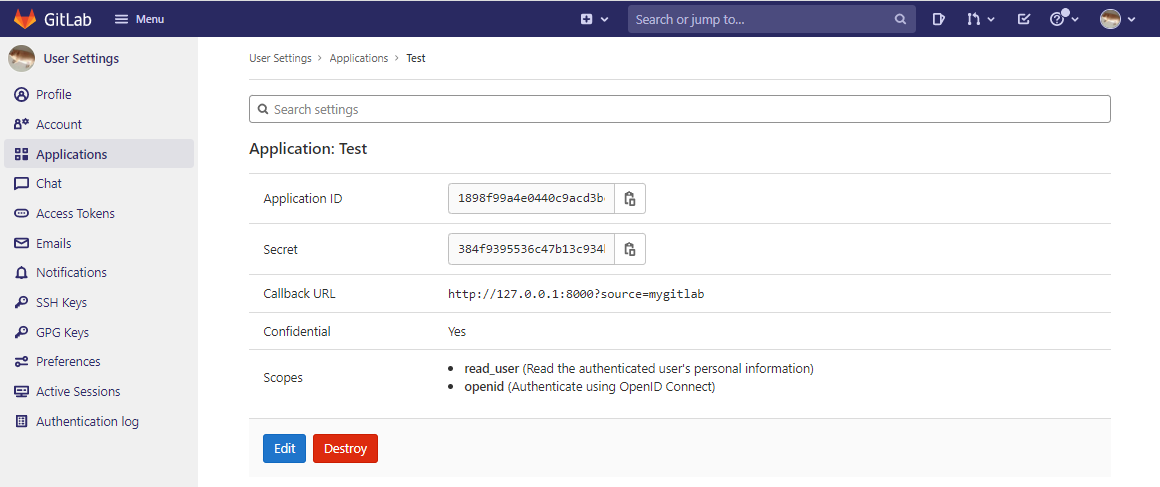
创建应用并获取Key
# 后端
# 配置
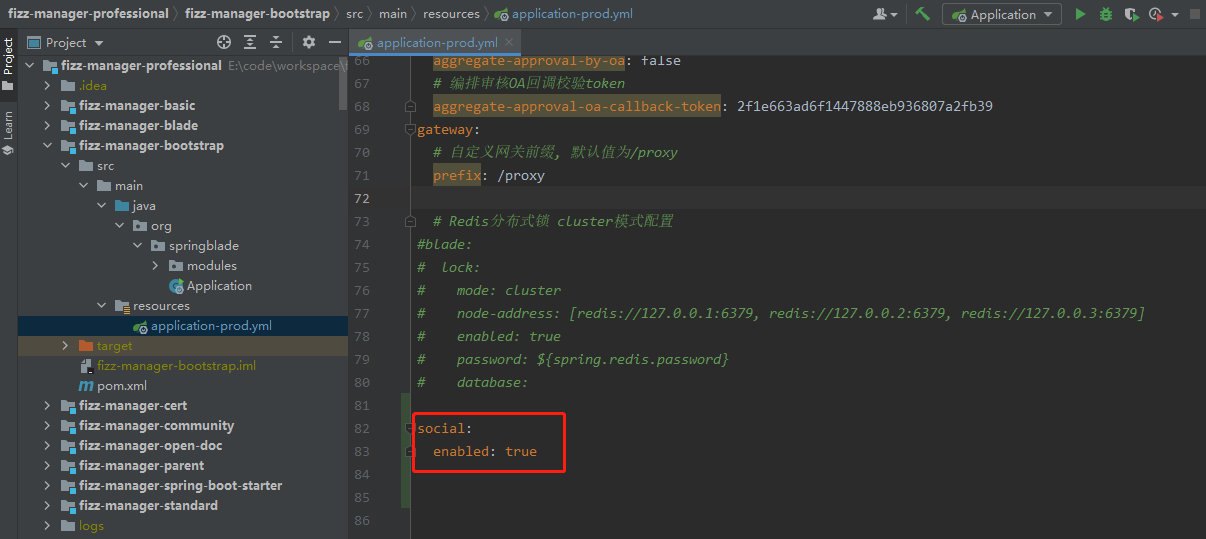
启用第三方登录,application-prod.xml配置文件中加入以下配置:
social:
  enabled: true
数据库执行SQL:
UPDATE blade_client SET access_token_validity = 2592000, refresh_token_validity = 2592000 WHERE id = 1123598811738675201;
该SQL会更新FizzGate自身令牌的有效时间(单位秒)为1个月,该时间需要大于第三方平台令牌的有效时间,避免FizzGate自身令牌失败后需要重现登录。
# 实现AuthRequestService接口
实现org.springblade.modules.social.service.AuthRequestService接口,通过接口实现提供第三方平台对应的AuthRequest。
实现参考如下:
package org.springblade.modules.social.service.impl;

import me.zhyd.oauth.config.AuthSource;
import me.zhyd.oauth.request.AuthRequest;
import com.alibaba.fastjson.JSONObject;
import me.zhyd.oauth.cache.AuthStateCache;
import me.zhyd.oauth.config.AuthConfig;
import me.zhyd.oauth.enums.AuthUserGender;
import me.zhyd.oauth.exception.AuthException;
import me.zhyd.oauth.model.AuthCallback;
import me.zhyd.oauth.model.AuthToken;
import me.zhyd.oauth.model.AuthUser;
import me.zhyd.oauth.request.AuthDefaultRequest;
import me.zhyd.oauth.utils.UrlBuilder;
import org.springblade.modules.social.service.AuthRequestService;
import org.springframework.stereotype.Service;

/**
 * AuthRequest服务接口实现类
 * 参考:https://justauth.wiki/features/customize-the-oauth/
 *
 * @author zhongjie
 * @since 2.7.0
 */
@Service
public class AuthRequestServiceImpl implements AuthRequestService {

	@Override
	public AuthRequest getAuthRequest(String source) {
		if ("mygitlab".equals(source)) {
			return new AuthMyGitlabRequest(AuthConfig.builder()
				.clientId("1898f99a4e0440c9acd3bcb6883f197bb0437f780be4dc8870193446d8fe131e")
				.clientSecret("384f9395536c47b13c934b52c192e37508f813e5b04bf2ca56d00acbf1fcc792")
				.redirectUri("http://127.0.0.1:8000?source=mygitlab")
				.build());
		}

		return null;
	}

	@Override
	public boolean preHandle(HttpServletRequest request, HttpServletResponse response, Object handler, String source, String accessToken) {
		// 每次接口调用前校验逻辑
		return true;
	}

	@Override
	public void logout(String source, String accessToken) {
		// 登出时逻辑
	}

	enum AuthCustomSource implements AuthSource {

		/**
		 * 自己搭建的gitlab私服
		 */
		MYGITLAB {
			/**
			 * 授权的api
			 *
			 * @return url
			 */
			@Override
			public String authorize() {
				return "http://gitlab.xxx.com/oauth/authorize";
			}

			/**
			 * 获取accessToken的api
			 *
			 * @return url
			 */
			@Override
			public String accessToken() {
				return "http://gitlab.xxx.com/oauth/token";
			}

			/**
			 * 获取用户信息的api
			 *
			 * @return url
			 */
			@Override
			public String userInfo() {
				return "http://gitlab.xxx.com/api/v4/user";
			}
		}
	}

	static class AuthMyGitlabRequest extends AuthDefaultRequest {


		public AuthMyGitlabRequest(AuthConfig config) {
			super(config, AuthCustomSource.MYGITLAB);
		}

		public AuthMyGitlabRequest(AuthConfig config, AuthStateCache authStateCache) {
			super(config, AuthCustomSource.MYGITLAB, authStateCache);
		}

		@Override
		protected AuthToken getAccessToken(AuthCallback authCallback) {
			String response = doPostAuthorizationCode(authCallback.getCode());
			JSONObject object = JSONObject.parseObject(response);

			this.checkResponse(object);

			return AuthToken.builder()
				.accessToken(object.getString("access_token"))
				.refreshToken(object.getString("refresh_token"))
				.idToken(object.getString("id_token"))
				.tokenType(object.getString("token_type"))
				.scope(object.getString("scope"))
				.build();
		}

		@Override
		protected AuthUser getUserInfo(AuthToken authToken) {
			String response = doGetUserInfo(authToken);
			JSONObject object = JSONObject.parseObject(response);

			this.checkResponse(object);

			return AuthUser.builder()
				.uuid(object.getString("id"))
				.username(object.getString("username"))
				.nickname(object.getString("name"))
				.avatar(object.getString("avatar_url"))
				.blog(object.getString("web_url"))
				.company(object.getString("organization"))
				.location(object.getString("location"))
				.email(object.getString("email"))
				.remark(object.getString("bio"))
				.gender(AuthUserGender.UNKNOWN)
				.token(authToken)
				.source(source.toString())
				.build();
		}

		private void checkResponse(JSONObject object) {
			// oauth/token 验证异常
			if (object.containsKey("error")) {
				throw new AuthException(object.getString("error_description"));
			}
			// user 验证异常
			if (object.containsKey("message")) {
				throw new AuthException(object.getString("message"));
			}
		}

		/**
		 * 返回带{@code state}参数的授权url,授权回调时会带上这个{@code state}
		 *
		 * @param state state 验证授权流程的参数,可以防止csrf
		 * @return 返回授权地址
		 * @since 1.11.0
		 */
		@Override
		public String authorize(String state) {
			return UrlBuilder.fromBaseUrl(super.authorize(state))
				.queryParam("scope", "read_user+openid")
				.build();
		}
	}
}
第三方登录后FizzGate使用自身的令牌校验逻辑,不再和第三方交互。
如需要每次请求后台都校验第三方平台访问令牌,可实现AuthRequestService中的preHandle接口,以实现自己的校验逻辑。
如需要登出时通知第三方平台登出,可实现AuthRequestService中的logout接口,以实现自己的登出逻辑。
源码可查看项目fizz-manager-stardard/fizz-manager-bootstrap/src/main/java/org/springblade/modules/social/service/impl/AuthRequestServiceImpl。
# 前端
1、第三方登录入口 (源码: src\page\login\thirdlogin.vue)
使用window.location.href 打开一个新页面, 地址为: ${window.location.origin}/api/fizz-manager/blade-auth/oauth/render/${source}
其中 source 和后端代码的source对应上。
		<template>
			<div class="social-container">
				<div class="box"
						@click="handleClick('mygitlab')">
					<span class="container"
								:style="{backgroundColor:'#6ba2d6'}">
						<i class="logo-icon el-icon-s-comment"/>
					</span>
					<p class="title">mygitlab</p>
				</div>
			</div>
		</template>

		<script>
		import website from '@/config/website';
		export default {
			name: "thirdLogin",
			methods: {
				handleClick(source) {
					window.location.href=`${website.authUrl}${source}`;
				}
			}
		};
		</script>
2、在第三方平台登录成功后,会跳转登录页。其中,跳转回来的地址,将会携带 source、 code 、 state 参数。 通过调用 handleLogin() 方法,解析 source、 code 、 state 参数 并调用 /blade-auth/oauth/token 接口获取用户信息并在前端缓存起来(和通过账号密码登录的操作逻辑大致相同),然后跳转到首页。至此,已登录成功。 (源码: src\page\login\index.vue)
	handleLogin() {
		const topUrl = getTopUrl();
		const redirectUrl = "/oauth/redirect/";
		this.socialForm.source = getQueryString("source");
		this.socialForm.code = getQueryString("code");
		this.socialForm.state = getQueryString("state");
		if (validatenull(this.socialForm.source) && topUrl.includes(redirectUrl)) {
			let source = topUrl.split("?")[0];
			source = source.split(redirectUrl)[1];
			this.socialForm.source = source;
		}
		if (!validatenull(this.socialForm.source) && !validatenull(this.socialForm.code) && !validatenull(this.socialForm.state)) {
			const loading = this.$loading({
				lock: true,
				text: '第三方系统登录中,请稍后。。。',
				spinner: "el-icon-loading"
			});
			this.$store.dispatch("LoginBySocial", this.socialForm).then(() => {
				console.log(this.$route.query)
				const redirectUrl = decodeURIComponent(this.$route.query.redirect) || getQueryString("redirect_uri");
				if (this.$route.query.redirect && redirectUrl) {
					this.$router.replace(redirectUrl);
				} else {
					this.$router.push({path: this.tagWel.value});
				}
				this.clearUrlQuery();
				this.$store.dispatch("GetLicense");
				this.getEGifInfo();
				loading.close();
			}).catch(() => {
				loading.close();
			});
		}
	}
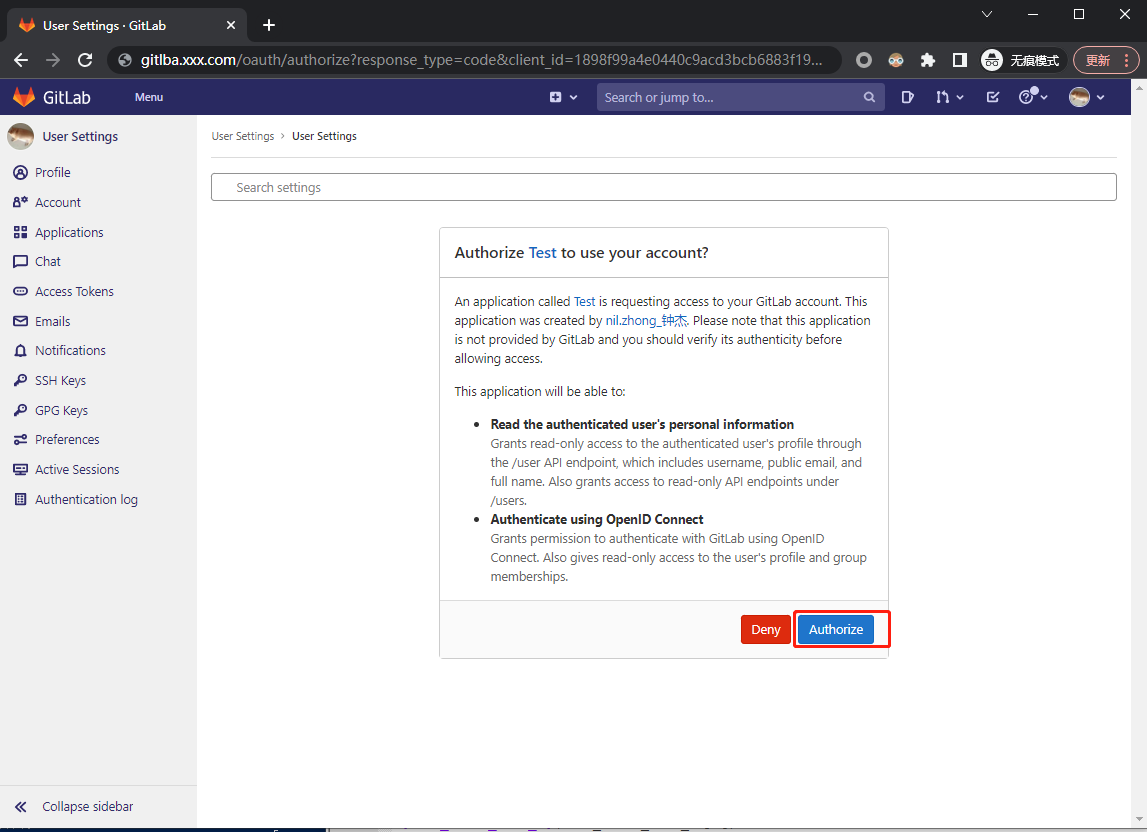
# 测试效果